The most efficient way to create alerts for camera disconnects on a server is to leverage the power of our Places. In the following Knowledge Base we will create a rule that will email whenever a camera from a certain site loses connection for more than 60 seconds.
First, be sure to set your Scope to the relevant Place for which you are making the rule. In the example below I am making this rule for any cameras within Josiah Security Co. (To set scope see KB HERE)
- Browse to the Rules section below Configuration and click the "Create Rule" button on the top.
- Give the Rule a "Name" and a "Description" so you can easily identify it in the future.
- Select the Schedule for this rule. In most cases it will be "Always".
- If you need this rule to only execute during specific times you will need to create a custom schedule first. Please cancel this configuration and refer to the Schedules KB for assistance there.
- Now we need to add the Triggers that will cause our notification to occur. Select Add Condition
- Here the What will be "Type", leave the Operator "is equal to", and the Value will be "Device Connection", Finally be sure to click the green "Create" button.

- We will now add a second condition. What will be "Status, Operator will be "is equal to", and Value will be "Disconnected". Click the "Create" button on the bottom.
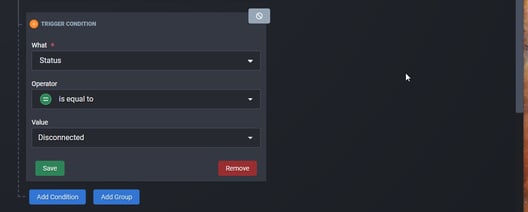
- The above configuration says that anytime a Device Connection says Disconnected, we will trigger this rule.
- Here the What will be "Type", leave the Operator "is equal to", and the Value will be "Device Connection", Finally be sure to click the green "Create" button.
- Now we are going to add a Guard to help avoid getting notified on momentary connection blips. Click Add Guard.
- Here we will set the Amount of Time Delay to "60" seconds (for the example)
- Now we need to tell the system what to watch for in those 60 seconds that will prevent our rule from firing. In this example we want to prevent firing if the camera connects within 60 seconds of the disconnect. To do this we essentially put the inverse of our trigger rule.
- Click add Condition. What is "Type", Operator is "is equal to", Value is "Device Connection". Then click Create on the condition
- Then we add our next condition. What is "Status", Operator is "is equal to", Value is "Connected". Then click Create on the condition
- Finally click Update on the Suppression Guard
- Our final step is to create our Action we want to happen when the above occurs.
- Click Add Action and in our case we will choose Email Notification. You can also get SMS or Webhooks to trigger based on the rule if you choose.
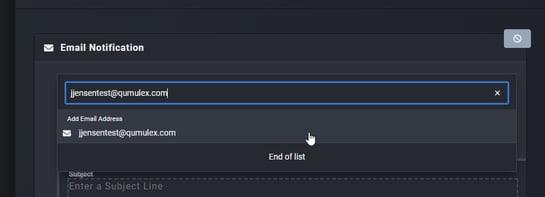
- Next we will type in the email address(es) that we would like notified. Start by typing in the first one. If this email is associated with an existing user on the system it will show in the dropdown and you can click directly on it. If not, complete typing the email and click on the row below displaying that address.
- Now we will build the email that will be received. Type the Subject line in under Subject. This is a free form box, we suggest giving it a subject that is easily identifiable.
- Then add the Body of the email. Here you can be a little more verbose. Example: "A camera at Josiah Security Co. has been disconnected for more than 60 seconds. Please check."
- Finally we can assign a Rate Limit Override. This limits how often the email can be sent. The main goal is to avoid a rapidly repeating trigger condition from spamming your inbox. You can choose what, if any, rate limit you would like to add.
- Click Update to save the above changes
- Finally click Create Rule at the bottom of the page, and your rule is active and ready to go!