If you have an Axis 1001 or 1601 follow the below steps.
- You will likely need the Axis Discovery Utility to find the controllers initial/current IP address.
- The tool can be downloaded here https://www.axis.com/axis-ip-utility/download
- Once you have the current IP address you can set the desired IP from utility, or log into the axis controllers web page via a browser and change it.
- Also verify that the time and date are correct on the device. If either are incorrect this can cause numerous issues including connection. You can set it to sync with an existing time server, or point it to the Gateway it is connecting to.
- Once the IP is set navigate to QxControl
- Ensure your Scope is set to the Place you are working on.
- To do this select the blue box on the upper right next to your login
- Select the place your gateway is listed from the dropdown (often green colored icon)
- Select Set Scope
- Doing this ensures that you are working with the proper server(s) and reduces the chance of error
- Navigate to Places and ensure that at a minimum there are two Areas created. If you do not have any we suggest a simple "Inside" and "Outside" Area. This is important because this will be the core for navigation. A badge will move you from a certain area to another area. Like from Outside to Inside. Or from Lobby to Main Hall. Etc.
- To create an Area under your Gateway simply highlight Place you want the area underneath (usually green) and select Add from the menu on the bottom right.
- Name the area what you desire (ex. "Outside")
- And ensure the "Type" is "Area"
- Click OK
- Repeat 5a-5d for at least one more area (ex. "Inside") and all further areas being created.
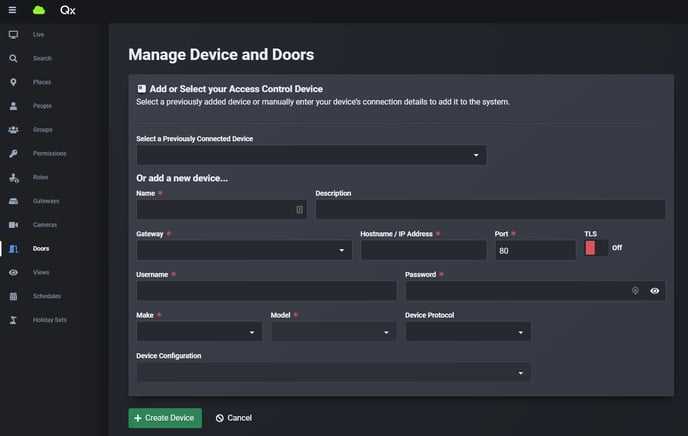
- Navigate to the Doors menu on the left side.
- Click Create Door.
- Name the Device. You can also give a description if you like.
- Select the Gateway this Axis controller is going to communicate to.
- Add IP you setup in the axis utility. If you changed the device away from the default port 80, you can add that here as well.
- Put in the Username and password you set using the axis utility. If this is still default we highly recommend changing that via the Controllers webpage or the Axis Utility.
- Select Make (Axis)
- Select Model A1001 or A1601.
- Select Device Protocol (Wiegand or OSDP) Wiegand is the most common used.
- Use Wiegand0 if your access cards do not have a site code.
- Select your Device Configuration.
- Single 2 Reader Door: Controller covers only one door and both readers go to the same door.
- Two 1 Reader Door: Controller covers two doors, one reader for each.
- Click Create
Once you are done with your configuration please remember to reset your Scope by clicking the blue box near your name on the top right and select Clear Scope and hit OK.