![qumulex_logo_full_color.svg]](https://www.qumulex.com/hubfs/qumulex_logo_full_color.svg)
Version: 1.0 | Created: March 3, 2025
This guide walks an Integrator through setting up a new QxControl Cloud system, from preparing the customer in QxControl before the Gateway arrives, to adding cameras and creating views on install day.
Pre-Installation Setup
These steps can be completed before the Qx Gateway is delivered.
Customer Preparation
- Browse to https://app.qumulex.io using Chrome, Firefox or Edge, and log in with your Integrator credentials.
- Select Places from the left-hand menu.
- Click Actions and then Clear Scope.
- If this Customer already has a Place created, skip to step 5. Otherwise:
- Highlight your Integrator name at the top of the tree.
- Click Create Place.
- Make sure the Parent Place is your Integrator and the Type is Customer.
- Type in the name of the customer (ex. School System) and add the timezone if known.
- Click Create Place.
- Locate the new system in the Places tree under Unassigned Gateways. It is named using the PO number given to Qumulex for this customer job. The icon looks like buildings, and may be green or red depending on the Gateway's current connection status. The next steps can be completed regardless of status.
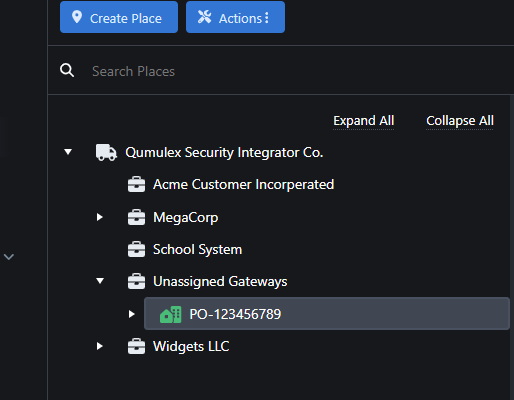
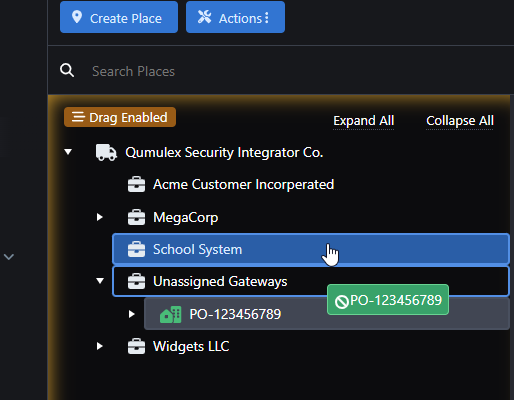
- Select Actions and Enable Place Dragging.
CAUTION: Be very careful in this mode. - Drag the Site with the correct PO name and hover it over the new (or existing) Customer. Release it, and the Site and Gateway move automatically.
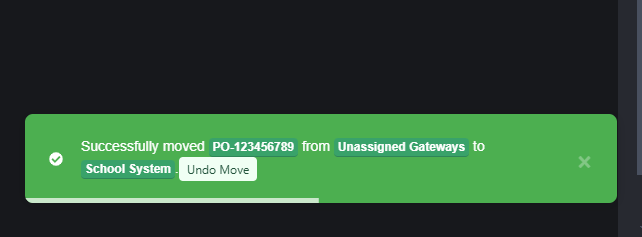
- You should receive confirmation that the transfer completed within a few seconds.
- IMPORTANT: Once this is complete, click Actions and then Disable Place Dragging.
- Set your scope to the new Customer/Site. This makes sure settings changes only affect this location.
- Highlight the new Site under the Customer in your Places tree.
- Click Edit Place and rename the Site to something relevant to the installation. Fill in any of the optional information.
Example of a Customer and Site hierarchy:
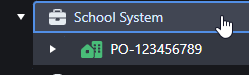
You can now create any of the following if needed. This can also be done later in the process.
- Areas – Created in the Places section. Mainly used for Access Control to define physical areas (ex. "Inside" and "Outside"). They can also define logical areas to organize cameras (ex. "Floor 1" and "Floor 2").
- People – Add anyone who needs access to the system.
- Add credentials if this person needs access control permissions.
- Assign a Role if this person will use the QxControl software directly.
- Groups – Logical groups of people who need one or more common permissions to a Place.
- Schedules – Restrict the times people can access Places (Access Control).
- Permissions – A combination of Group, Schedule and Place that defines who can access Doors, and when.
Camera Preparation
Specific settings vary by manufacturer.
- We suggest a physically separate network switch for the cameras, connected to the LAN port of the Gateway.
- Use static IP addresses, or reserved DHCP addresses, for the cameras. This avoids video loss when an IP changes.
- Discover each camera's IP address using ONVIF Device Manager or the manufacturer's tool.
- Browse to the camera in a supported web browser.
- Set the basic camera parameters to fit the customer's needs:
- IP address and credentials
- Motion settings – not all cameras have motion turned on by default!
- Video streams (some cameras have a separate ONVIF stream setup, such as Axis):
- A high-resolution H.264/H.265 stream for recording
- A secondary, lower-resolution H.264/H.265 stream for live view bandwidth management
- Time zone/DST – synchronize to the Gateway if possible, otherwise set it to match local time. The time must be correct for the camera to connect.
For more detail, see Camera Best Practices.
Install-time Setup
Gateway Connection
- Connect the LAN port of the Qx Gateway to the private physical security network at the site.
- Connect the WAN port of the Qx Gateway to the customer network with internet access.
- Plug the Qx Gateway into AC power and press the power button on the front (it may be behind a hinged door).
- Make sure your laptop is on the customer network with internet access.
Software Setup
- Browse to https://app.qumulex.io and log in with your QxControl credentials.
- Find the customer Site matching the name you set above. You may need to clear your scope to see it.
- Highlight it and click Actions and then Set Scope.
- Wait for the Site icon to turn green (around 5 minutes).
- Both network ports are set to DHCP from the factory. If the LAN or WAN needs a static IP:
- Browse to the Gateways page under Configuration and click the Gateway you are configuring.
- Click the Config button and choose Go To Webpage.
- Follow the Gateway IP Settings article.
Add Cameras
- Browse to the Gateways page under Configuration on the left side.
- Select the Gateway the cameras are being added to.
- Select Discover Devices.
- By default this runs an ONVIF scan, which should find all ONVIF-compatible devices within the available network.
- If nothing shows up, check your network settings from the earlier steps.
- Check all the devices you want to add and click Select Devices.
- In the shortened list, click the exclamation point next to Needs Config on the right side.
- Name the camera and enter its credentials.
- Click Next and repeat for each device you are adding.
- IMPORTANT: When you're finished, click the green Close button, then be sure to click Add Devices at the top right.
- Browse to the Cameras page and make sure every camera shows a green connected icon once the connection completes.
- To verify motion is being recorded, look for a blue border around the video during a motion event in Live.
Create Views
- Go to the Live page and click the grid icon in the upper right.
- Select Layouts and choose your preferred layout.
- Select Widgets and drag any combination of cameras, widgets and doors into your layout.
- Click the views icon and type in the view name.
- Click Save as New View.
- Optional: to show a view automatically when Live opens, open the Views tab on the right, find the view, click the kebab menu (3 dots) and choose Set as Default for X.
Need help?
Contact Qumulex Support at support@qumulex.com or 317-207-0520.